Wednesday. 4PM. Frantically searching the refrigerator to figure out what food can be combined to make a healthy, delicious dinner for my family.
Once again, the thought flits through my head: I really need to start making weekly menus again.
Thursday night. I’ve got dinner started, but realize I’m missing 2 vital ingredients. I call my hubby at work and ask him to pick up 2 tomatoes and parmesan cheese on his way home.
And yes, again, I think about how much easier it would be if I did meal planning before I went to the store each week.
I’m sad to say, this is a regular occurrence in my house. All too often, I neglect to plan and it makes my afternoons much too hectic.
Why We Need Build A Menu
I am super excited that I was recently introduced to a robust, easy-to-use tool that can revolutionize meal planning. Ladies, we need this (yes, I said we, because as you can see, I also need this).
Special thanks to Build A Menu for sponsoring this post and give me a chance to try out their awesome online menu planning tool.
Why is this a tool that you’ll come to rely upon?
- Build A Menu is a quick and easy way to put together a weekly menu.
- You won’t be left scratching your head each week, wondering what to make for dinner and how to not repeat all of your meals from last week.
- You’ll be given lists of creative recipes that are easy to prepare!
- Your family will eat healthier.
- You’ll save money.
A Walk Through Build A Menu
Let’s take a walk through Build A Menu. I’m sharing lots of screen shots so you can see just how it works. Then, at the end of the this post I’m going to give you the low-down on what I thought was awesome and what I thought could stand a bit of improvement with the system (so if you’re just interested in that, skip to the bottom).
1. Sign Up
The sign up process was pretty standard. Enter all of your vital information. The only unique thing that you may notice when you sign up, is that you’re given a list of charities to choose from (there will likely be several you’ll recognize like Compassion, Arms of Hope, and more). Why charities? Because Build A Menu gives a percentage of each sale to help one of these charities. How cool is that?!
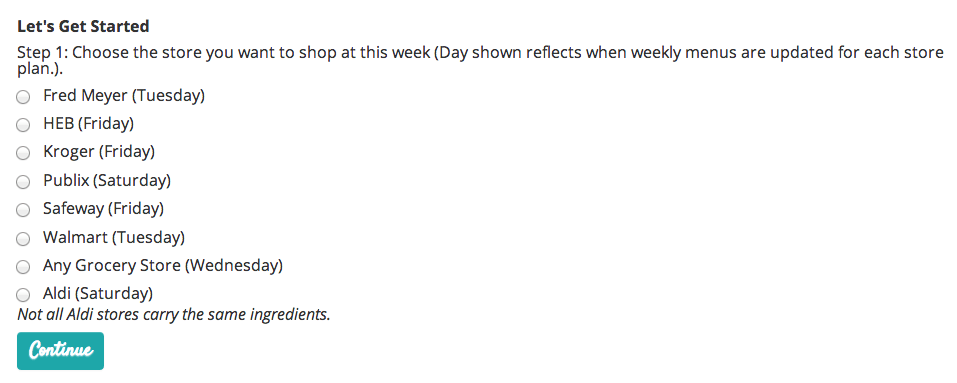
2. Choosing Your Grocery Store
The first step, after registering, is to pick out your grocery store (see image below). I tend to shop at Meijer, Kroger, and/or Aldi. The program had 2 of the 3. I chose Kroger because I typically can’t find all of the groceries I need at Aldi—particularly the organic food items I like to buy. (I don’t purchase all organic, but do try to buy all organic for the dirty dozen).
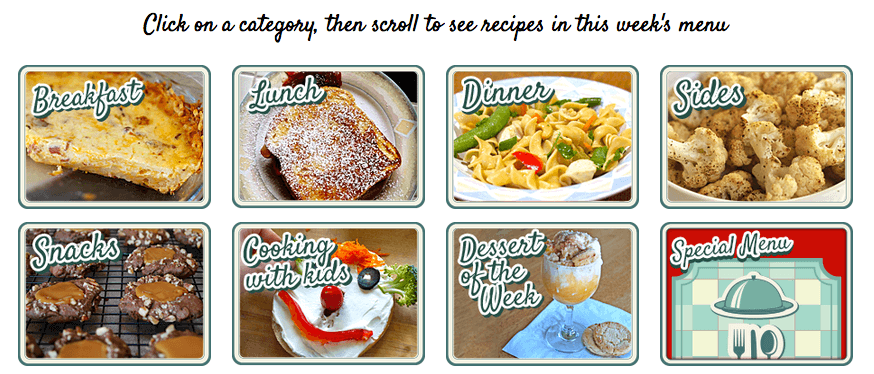
3. Meal Categories
Next, you’ll be prompted to select the category of recipes you’re looking for. Do you want to plan your breakfasts, lunches, and dinners using Build A Menu? They have you covered. I chose to only plan dinners, because the other meals are pretty low key and easy around here. I spent my time in the “Dinner” and “Sides” categories.
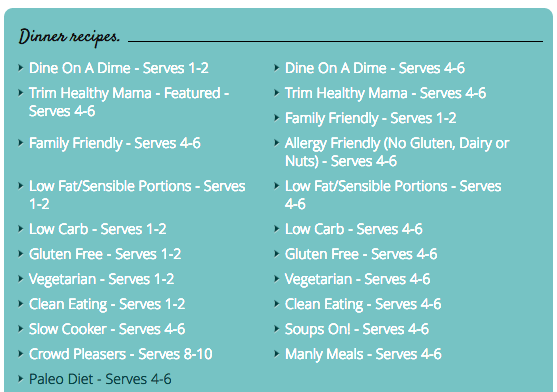
4. Check Out the Recipes
After you choose which category of recipes to look at, you will be able to choose which recipes you want to look at. Looking for low cost? Paleo? Low-Carb? Trim Healthy Mama approved recipes? This program has you covered! Check out all of the options for dinner recipes in the image below. I loved this option!
Notice the legend below. These icons let you know if recipes are low cost, vegetarian, gluten free, low-fat, low-calorie, or sensible portions. This is particularly important to me, since our whole family follows a gluten-free lifestyle.
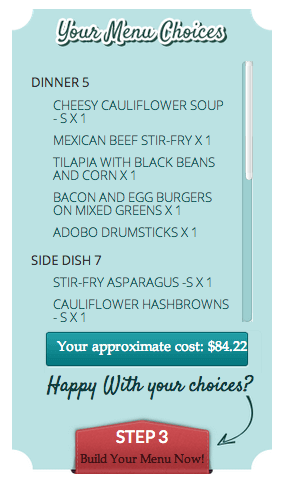
As you choose your recipes, there is also a section in the sidebar which keeps a running tally your grocery costs while you build your menu. Every time you add a recipe, it adds it to this widget.
5. Put Your Meals on the Calendar
After choosing your recipes, you’ll then be directed to a page where you can drag and drop your recipes on to a calendar. You can see how I did that below. You may notice that I left 2 days of the week with nothing planned. That’s because I have a date planned with my hubby one night, and the other night will be leftovers night.
6. Print Your Grocery List
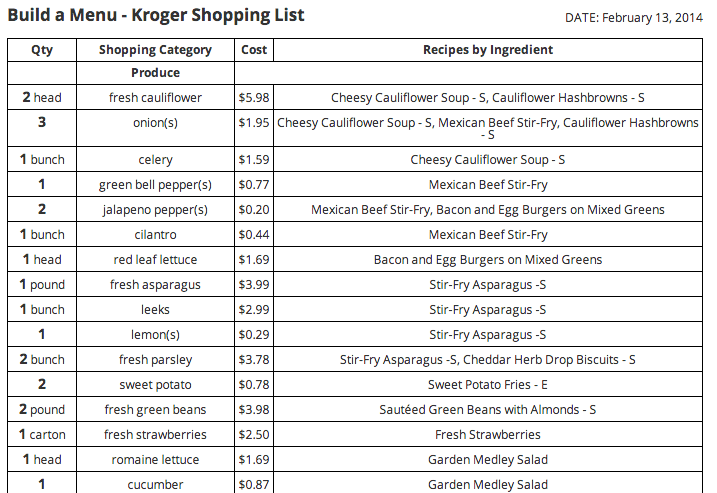
Next, you’ll want to click a button to be taken to a page where you can view and print your shopping list.
It also lists “staples” at the end of the grocery list. These are things it’s assumed you have in your pantry and don’t need to purchase. If you don’t have these items, be sure to circle the items you need and grab those while you’re at the store.
What I Loved About Build A Menu
I’m not completely new to the online world of menu planning. Before trying Build A Menu, I had tried another popular online menu planning tool, but I wasn’t impressed. I actually had a number of free months with the service, but I didn’t use it past the first week because it was just too cumbersome. The ease with which Build A Menu works, is the first thing that I was impressed with.
1. Lots of recipes to suit our families eating habits. For my first menu, I chose options from the Paleo Diet, Low Carb, Gluten Free, Clean Eating, and Trim Healthy Mama sections. Build A Menu has recipes for numerous special diets, and I found plenty of recipes to fit our families nutrition goals. Not to mention, when you plan meals ahead of time, you’ll be less likely to default to fast food.
2. No more boring meals. Do you get stuck in a rut with meals? I do. I often repeat the same meals over and over. Build A Menu won’t repeat a recipes more than once every four months for each grocery store plan. Wow! That’s cool. No more boring repeats week after week.
3. Easy, easy, easy to use. Did I mention it was easy to use? I was so impressed with how intuitively easy it was.
4. Saves time. I’m a busy girl. This is an important feature. Seriously, it might take you 5-7 minutes to do your whole meal plan and have your grocery list printed off using Build A Menu. Can’t get much faster than that.
5. Saves money. You won’t be picking up fast food so often, so you’ll save money there. Each recipe also indicates how much the recipe will cost. Also, Build A Menu has a unique widget that keeps a running tally of how much your grocery bill will be for the meals you’ve chosen. If you are finding yourself going over your grocery budget, you can easily go back and replace some of your pricier meals with cheaper meals.
6. A portion of your proceeds will go towards a charity. You can choose which charity when you are setting up your account—but it’s a hard choice because there are some great charities that are doing awesome work.
Options that Would be Nice to See on Build A Menu
1. I’d love to see the creators of Build A Menu make a more sophisticated shopping list. This is by no means a deal-breaker, but they could do some cool things with this (so says the girl who knows nothing about making programs).
It would be nice if I could edit the shopping list. I’d like to be able to eliminate certain ingredients if I already them in the fridge/pantry/freezer. For instance, I will typically have all of the meat for my meals in the freezer. Likewise, it might be nice to be able to manually add items to the list. Since we keep our breakfasts and lunches pretty easy, I don’t usually plan real specific things for these meals. We eat a lot of eggs, bacon, sausage, and that sort of thing for breakfast. After printing the list, I can always cross out items I don’t need and jot down the items I do need, so it’s not a big deal. But would make for a nice extra feature!
2. One of the stores I frequently shop at, Meijer, was not listed as an option. I can often find a lot of the organic produce I like to find at Meijer on sale, so I enjoy shopping there, but I’m sure it’s difficult to have all of the grocery store options listed. I was pleased they had two grocery stores that I frequently shop at listed as options.
Ladies, go check this out now. For the modest price of just $8/month if you’re paying monthly or $76/year (that comes out to $6.33/month) you really can’t go wrong. You likely end up wasting more than that on grabbing a “quick bite” via take-out. I know you’re going to love this program!





Leave a Comment